Supervisors
Routing and approval flow
When an employee presses the submit button on a monthly calendar, a document is routed to you for approval. This document is available in your Workflow action list. When you open the document from Workflow, you are taken to the Staff Report Approvals tab in ePTO for the month awaiting approval for the employee. You have the option of accessing this tab via Workflow or directly through ePTO.
Delegate functionality
Per university policy, it is your responsibility as a supervisor to review and approve time-off entries for your employees. However, when situations arise that prevent you from being able to approve monthly time-off calendars, please work with your ePTO administrator to submit a support request for the creation of a delegate. The ePTO administrator for your unit must submit this request indicating your position number, the delegate’s position number, and an expiration date for the delegation. Below is a description of how the system behaves regarding delegates.
When employees submit their monthly time-off records for approval, they route through Workflow to the delegate, not to you. You still have access through the ePTO Staff Report Approvals tab to take action on the report, but you will not receive notification through Workflow.
The delegate has a new tab in ePTO called Delegates. This tab looks and behaves much like the Staff Report Approvals tab except it only includes employees for whom the delegate has responsibility. If the delegate also has Exempt staff reporting directly to them, those employees will continue to be listed under the Staff Report Approvals tab.
Delegates have the same functionality as supervisors in that they can approve, disapprove, or correct and approve records for employees who have been delegated to them. Delegates also have the ability to correct approved records for these employees.
Calendar navigation and approvals
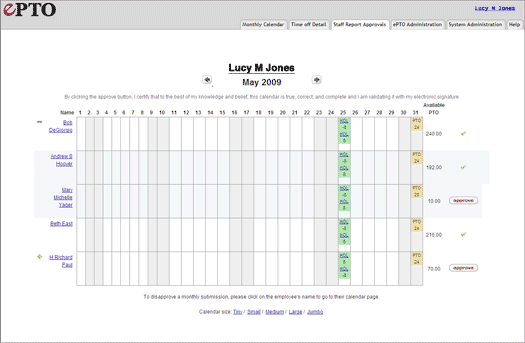
Staff Report Approvals tab

This tab is only available to supervisors. It is a monthly grid with one row per employee for whom you are responsible (as determined by the “reports-to” value in HRMS for the position). The accruals and usage of each employee is shown here for a quick review.
- If you have employees who also supervise Exempt staff, you can click on the PLUS (+) sign to the left of their name to expand the list to see those employees.
- To the right of the grid, an “Available PTO” balance is displayed for each employee. This is the same value as the “Available this month” value for PTO displayed to the employee on their calendar. This value takes into account actual and projected usage and accruals. The value in this field represents the remaining amount of PTO the employee has available to take in that month.
- Use the arrows to the right and left of the month to scroll throughout the year.
- Click on an employee’s name to open their calendar to see more detail, make corrections, or disapprove.
- Icons to the right of the row for each employee indicate the report status:
- An approve button (
 ) displays when an employee has submitted a report that is awaiting approval.
 - A green checkmark (
 ) displays after the approval has been fully processed in Workflow
Approving/disapproving an employee’s monthly submission
If the record of time-off for the employee is accurate and you are ready to approve it, simply click on the approve button to the right of the employee’s time-off record. This approves the document and removes it from your Workflow action list. The employee receives an email advising of the approval.
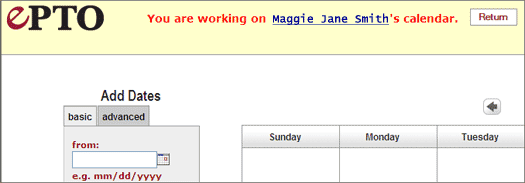
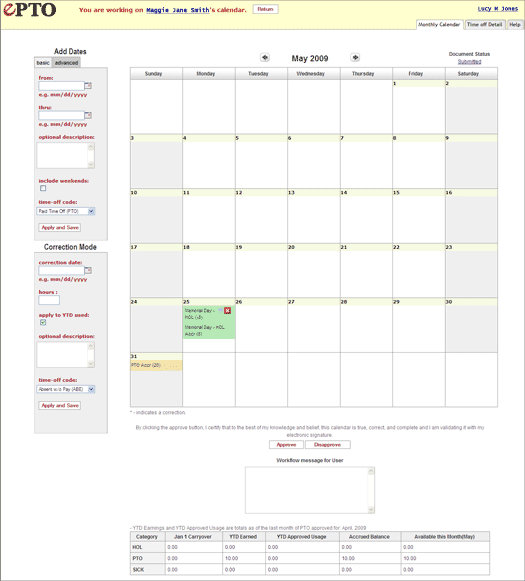
If you are unsure that the record is correct and you want to review it more closely, click on the employee’s name to go directly to their calendar. When this occurs, the tabs displayed at the top of the page are those that the employee would see. A banner is also displayed at the top of the page indicating that you are working on an employee’s calendar. You can then:
- Approve the calendar by pressing the Approve button at the bottom of the calendar.
- Correct the calendar as needed (adding/removing time-off) and then approve it by clicking the Approve button. Note that each modification to the calendar results in an email being sent to the employee notifying her/him that a correction has been made. All corrections are logged in the employee’s Time Off Detail page with the user ID and date/time of the correction.
- Disapprove the calendar by pressing the Disapprove button. A note is required when disapproving a monthly calendar and is visible to the employee when viewing the Workflow route log for the document.
To return to the Staff Report Approvals tab from an employee’s calendar, click the Return button (![]() ) presented in the banner at the top of the page. After clicking Return, the normal tabs appear and the calendar/Time off Detail tab will be your own.
) presented in the banner at the top of the page. After clicking Return, the normal tabs appear and the calendar/Time off Detail tab will be your own.

Corrections
In addition to approving or disapproving employee time-off records, you can correct previously approved records for your employees. Follow the steps below to process a correction.
- Use the Staff Reports Approval page to find the employee whose record needs to be corrected.
- Click the employee’s name. (The tabs change to the employee’s tabs and a banner will be displayed at the top of the page indicating that you are working on another employee’s calendar.)
- Scroll to the appropriate month to be corrected.
- Use the Add Dates widget to add a time-off entry and use the “X” by a usage event to remove a time-off entry. Note that all updates made to the calendar via correction are logged and visible to the employee on the Calendar and Time-Off Detail tabs, and emails will be sent to the employee notifying her/him that a correction has been processed on the calendar.

Only system administrators have the ability to correct accrued balances. To correct accrued balances for an employee, you must submit an ePTO support form requesting the correction.
Still have questions?
Contact your ePTO Administrator.
