
Employees
Calendar Navigation
Monthly Calendar Tab
The Monthly Calendar tab is the primary tab in ePTO that you will use to record and submit your time-off information. Per university policy, employees are expected to record actual time-off taken on their calendar and submit it to their supervisors for approval on a monthly basis (the system will allow you to record time-off throughout the month, but you will not be able to submit for approval until the month has ended). Once your calendar has been submitted for approval, you can no longer make adjustments to it. Contact your supervisor or ePTO Administrator to have corrections processed.
Additionally, the system will allow you to record time-off in future months if you choose to do so as part of your planning. The system will not notify your supervisor of future time-off information that has been recorded on your calendar. It is still your responsibility (outside the ePTO system) to request and seek approval for the time-off from your supervisor.
As time-off is added to the calendar, it will be validated to ensure that you are not exceeding existing balances. For time-off added to the calendar in future months, the system will project the amount of time accrued for each month and will validate all time-off recorded against those projections.
Time-off Detail Tab

The Time-off Detail page is an annual view of time-off earnings and usage. This page allows you to see all entries in a summarized page, rather than scrolling through the calendar.
There are two tabs on this page: ![]() and
and ![]() . By default, the system will display the Projected view. This view includes all entries scheduled for the full calendar year. Note that the system by default will project all of your PTO accruals and Holidays for the full calendar year. As you add and remove events from the calendar, these entries will be adjusted as necessary.
. By default, the system will display the Projected view. This view includes all entries scheduled for the full calendar year. Note that the system by default will project all of your PTO accruals and Holidays for the full calendar year. As you add and remove events from the calendar, these entries will be adjusted as necessary.
The Actual view will only display usage and accrual records as of the end of the last approved month.
A few things to note when reviewing the Time off Detail tab:
- There is an option on both tabs to View Inactive. As you add and remove items from the calendar, the entries are actually inactivated, rather than deleted. This view will show those inactivated entries.
- A variety of conditions will trigger the system to recalculate monthly PTO and Holiday accruals. Some examples include a change in FTE, adding or removing absent without pay time-off codes from the calendar, etc. Due to this behavior, it is expected that the Time off Detail tab may have many “inactive” rows that are produced as part of these recalculations.
In addition to providing an annual view of earnings and usage, this page can be used to view details of corrections made to the calendar by the supervisor, delegate, or ePTO administrator.
Additional employee information
In the upper right hand corner of the calendar, your name is a link that takes you to a page containing additional details about how the system processes your time-off records. It includes information such as employee ID, PTO accrual rate, supervisor name, and ePTO administrator names.
Balances grid (bottom of the calendar)
Jan. 1 Carryover – the amount carried over from the prior calendar year after the annual transfer from PTO to Sick has occurred
YTD Earned – the amount of time-off accrued as of the end of the last approved month
YTD Approved Usage – the amount of approved time-off used year-to-date (this number does not include any time-off recorded on the calendar that has not yet been approved)
Accrued Balance – this figure equals: Jan 1 carryover + YTD Earned – YTD Used, as of the end of the last approved month
Recording and Submitting Time Off
Add Dates widget
- Use the Add Dates widget to the left of the calendar to insert time-off. You enter a date range, an optional description, and select a time-off code.
- Press the
 button to add the time-off.
Validation takes place when you click this button. If all validation passes, the entries will appear on the calendar. If the entry fails a validation test, a red error message will appear at the top of the widget.
Use the ![]() tab on the widget to record standard time-off codes: PTO, Sick, Honorary, and unused holidays.
tab on the widget to record standard time-off codes: PTO, Sick, Honorary, and unused holidays.
The ![]() tab is used to record less frequently used time-off codes on the calendar (such as FMLA, Absent, etc.). Several of these codes allow you to enter time-off in hourly increments and have more complex validation rules than the codes on the BASIC tab.
tab is used to record less frequently used time-off codes on the calendar (such as FMLA, Absent, etc.). Several of these codes allow you to enter time-off in hourly increments and have more complex validation rules than the codes on the BASIC tab.
Remove time-off
Click on the “X” next to the event on the calendar to remove time-off from the calendar.
You can only do this for months that have not yet been submitted. Note that you can only remove time-off usage—you cannot remove PTO and Holiday accrual entries.
Holidays
By default, the system assumes that you will take off holidays on the date they are observed. If you actually work on the holiday, you must remove the holiday via the “X” next to the holiday event on the calendar. Once removed, it will appear in the drop-down list of time-off codes on the BASIC tab, making it available for use at a future date.
NOTE: Any Holiday (HOL) hours transferred from Kuali TIME, if applicable after a transfer from a Non-Exempt to an Exempt position, will appear in your holiday accruals; however, they will not be available for you, your supervisor, or your administrator to add to your calendar. When you want to use this time, please ask your department’s administrator to send an ePTO support request indicating the day(s) you wish to use the transferred holiday.
You must take unused holidays by the end of the following year or they will be lost.
In the upper right hand corner of the calendar, your name is a link that takes you to a page containing additional details about how the system processes your time-off records. It includes information such as employee ID, PTO accrual rate, supervisor name, and ePTO administrator names
Submissions and approvals
The Submit button for a given month will appear on the first day after that month has ended. If you do not have a Submit button after the end of a given month, please check to make sure all previous months have been submitted and approved, as a month can only be submitted if all previous months have been approved. Occasionally, employees returning after previous Exempt staff employment will still have the Submit button on the last month of their previous Exempt position. If this occurs, please contact your ePTO administrator.
When you press the SUBMIT button on a monthly calendar, a document is routed to your supervisor (or delegate) for approval. This document is routed to the supervisor’s action list. The supervisor can take the following actions:
Approve the document. An email will be sent to the employee notifying them that the monthly calendar was approved.
Disapprove the document. A workflow acknowledgement will be sent to the employee notifying them that the monthly calendar was disapproved. A note is included in the route log describing why the calendar was disapproved.
Correct and approve the document. The employee will receive an email notification of the approval and of the correction that was made to their calendar
If you don’t regularly use your Workflow Action List or have discontinued Action List notifications, you may want to update your Action List preferences to get ePTO-related e-mails. To access your Action List, search for “Action List” in One.IU.
Viewing calendar workflow status
At the top of the monthly calendar, the Document Status is displayed as “Not Submitted”, “Submitted”, or “Approved”.
When the status is “Submitted” or “Approved”
You can click on the status to display the Workflow route log for the document. The route log includes the date, time, and user who approved the monthly calendar, as well as any notes they may have entered.
View corrections
Supervisors, Delegates, and ePTO Administrators have the ability to take the actions listed below on your behalf. Typically, the supervisor will take the first two actions only because you are unable to do so.
- Record/delete time-off on unsubmitted months
- Submit and approve a monthly record
- Make corrections to an approved monthly record
For all actions taken, you will receive an email notifying you that a correction has been made. Additionally, you can view the Time off Detail tab or the specific month on the calendar to see correction details.
Year end PTO transfer process
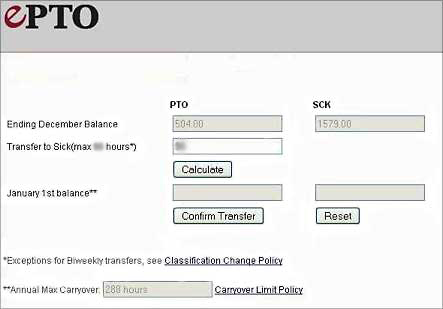
According to university PTO policy, employees can carryover PTO up to the amount of their annual accrual earned. This limit is based on years of service and is prorated by FTE: Less than five years = 240 max, 5+ years = 288 max. ePTO enforces this rule, and will only carry forward up to the max. Of your accrued PTO balance you are entitled to transfer up to 136 hours of PTO to your Sick bank. Any hours in excess of your annual carryover max + 136 hours are forfeited.
After your December calendar is approved, the Year End PTO Transfer screen will be presented when you log into ePTO. ePTO will default in a transfer value based on these rules.
- If you have more than the annual maximum in your Accrued PTO balance, ePTO will default the overage in the “Transfer to Sick” box. You can increase this number up to 136 hours, but you cannot reduce it.
- If you have less than the annual max in your Accrued PTO balance, ePTO will default zero in the “Transfer to Sick” box. You can increase this number, up to 136 hours.
- If you are in the carryover override table, your transfer amount will default as zero and you can increase it based on your override situation. Ex: Non-Exempt staff to Exempt staff transfer, see policy for details.
If you modify these amounts, you can hit the calculate button to see the results. Once you are satisfied with the balances, press the Confirm Transfer button. At this point calendar entries will be recorded which will reflect any transfers or forfeitures of PTO. You can then access the new year’s calendar. Any corrections to the prior year should be requested through your ePTO administrator.